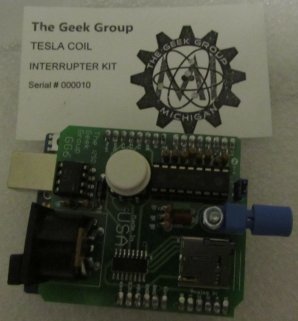
 Recently (Ok, so it’s been a while), I assembled the MIDI Interrupter Kit, available from The Geek Group here. I’ll go into more details after the jump, but in the meantime, please enjoy a time lapse video of that process along with a groovy jam before we continue, well, because what good is ANYTHING without a little bit of jam. Bread, electronics, cull lumber? Worthless without jam.
What in the world is a MIDI interrupter, you ask? Imagine a Tesla coil. You hit the switch that makes it sizzle. “Oooh, ahh, look at all of the lightning”, you say, “Smells like it just rained”. Champagne falls from the heavens, velvet ropes part, blah, blah, blah, very fun. Now, imagine being able to play MUSIC through your tesla coil. Think about it: A speaker creates sound by changing sound pressure when a woofer travels up and down a voice coil. A Tesla Coil does the same thing with electricity, hence the audible buzzing noise you hear. Why can’t we change the frequency of the “buzz” to make something resembling music? Well, we can with the MIDI interrupter!
There are several iterations of the MIDI interrupter available. Tons of schematics, options, etc., Bob’s your uncle. MIDI interruption is not a new concept, poly-tonal interruption even. There was even a musical group named “Arcattack” that auditioned (and placed fairly high) on “America’s Got Talent” who incorporated a musical Tesla coil:
So what makes The Geek Group’s kit so special? Imagine only being able to play a few notes, like the Arcattack performance above. Kind of limiting. Now imagine being able to play TWELVE notes through a Tesla coil simultaneously. THAT is exactly what this kit does. There are a couple of different options available for making this happen. You can either use the suppled MIDI port to take a signal directly from something else, such as an instrument (although Sparky Projects recently found that his keyboard will only allow 10 simultaneous notes, likely because you only have 10 fingers) or signal from your MIDI capable mixer device, or the onboard SD card slot where you can pre-load MIDI music in a predetermined format and toggle the playlist by pressing the big button. The signal is transmitted to the Tesla coil over a fiber link, or “opto-coupled”, if you will. This effectively shields the low voltage (and sensitive) microprocessor components from the high voltage of the coil. Of course, no project is complete without mentioning that the interrupter is based on the Arduino platform and is pretty much another “shield”, you know, for blog cred and all. Actually, to achieve the 12 notes that the project calls for using the baseline code, a Maple Leaf Board from Leaf Labs must be used because the speed of a run of the mill Arduino isn’t up to the task. You CAN refactor the code and interface with the data registers directly to make it work with the Arduino, but that isn’t recommended for a beginner. That speed does come at a higher price, though. Expect to pay about 10 bucks more for the Maple Board.
Even though not a lot of MIDI music is floating around with 12 note chords, here’s a little bit of a demonstration of what the MIDI interrupt kit is capable of, please enjoy Christmas in June!
So, if my hands weren’t currently covered in bacon grease, I would proudly give this kit two thumbs up. I’m REALLY looking forward to the next kits (poke, Chris, poke poke), as The Geek Group will be offering a full musical Tesla coil solution soon. What, you didn’t think all I did was eat gas station hot dogs and wash them down with Fanta slushes all day, did you? 🙂

hi, I have been interested in tesla coils my whole life and rescently I have been tying to figure out how I can make one that makes music…but I haven’t been abl to find any sites that actually explain all of the steps to creat one for myself at home…any thoughts?