 The holiday season is upon us. The Redneck Engineer, along with contributing Bacon Fat Labs member Scott-O (you’ll meet him soon) and several other of our mutual friends were over for our second annual after Thanksgiving Day get together. Some of you call it “Friendsgiving”. Well, we’re different (probably in a bad way) and call it “Thanksaturday”. After successfully deep frying a turkey on the driveway for the second year in a row without catching the house on fire (Thanks Zech!), and eating a fine high calorie meal that only your cardiologist and cholesterol would hate (Including Mrs. Redneck Engineer’s Bacon Wrapped Jalapenos), the men retreated to the garage to regale each other in the stories of days gone by as the scent of sawdust, oil, gas and cigar (not from me, yech) somewhat covered up the inevitable flatulent episode from one of us. I tripped over my parallel clamp collection as I walked out of the house.
Fast forward one week. I took advantage of the warm weather in Dallas this past Saturday (76 degrees according to the weather station) and worked in the shop/garage/lab/death trap/place where I store crap. After an 80+ hour week stuck at my desk, it was a welcome change.
For reasons that I don’t quite remember, I had a few pieces of plywood that were set to the side and ripped to 3″ wide, and I also found another piece that was ripped to 5 1/4″ wide. Shortly after that, I tripped over my collection of Jorgenson parallel clamps AGAIN that were leaning against the wall with no real place of residence.
Must. Fight. Urge. To. Put. Hole. In. Wall. With. Fist. Okay, I didn’t, but something definitely had to be done.
I have an idea!

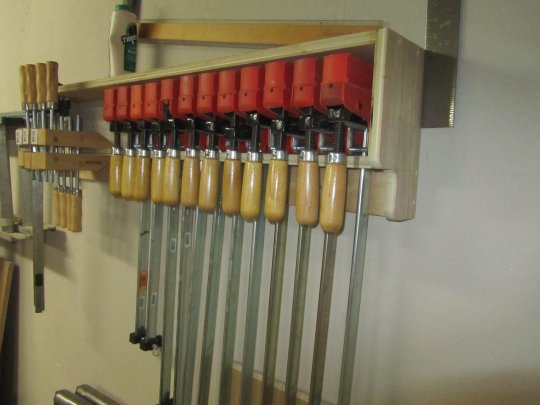
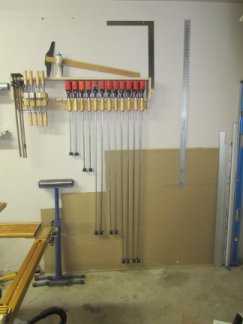
A lot of people have a clamp rack that sits on the floor, some of them are on wheels. I don’t like that approach because it still means that there is crap on the floor to trip over, and in my situation of limited space where all of the heavy tools are on mobile bases, something else that has to be moved around. Why do that when I have plenty of wall space for storage left? I remembered a clamp rack that Marc Spagnoulo, “The Wood Whisperer” had built for his shop and it seemed like a good approach for what I was trying to achieve. I would have to make sure that it worked for my Jorgenson’s, and I also wanted to make sure that I could build it totally with scraps that I had laying around (If you’re not a regular reader, just remember that my ultimate goal for a lot of things is frugality. More money for gas station hot dogs and raspberry Fanta Slushies). What I came up with was a very close rendition of his design to fit what I had on-hand. If you follow through to Marc’s article, you can see that his has a wood backer where mine does not. I realized why he did this as soon as I screwed the rack into the wall: That top shelf is slightly movable, but no cause for concern as long as I don’t really load it down. The rack itself is where most of the load resides, and it’s screwed into three different studs. That part is rock solid.
Construction
The most important piece of the clamp rack is the slotted assembly where the clamps rest. First, I measured the thickness of the rail on one of the clamp:
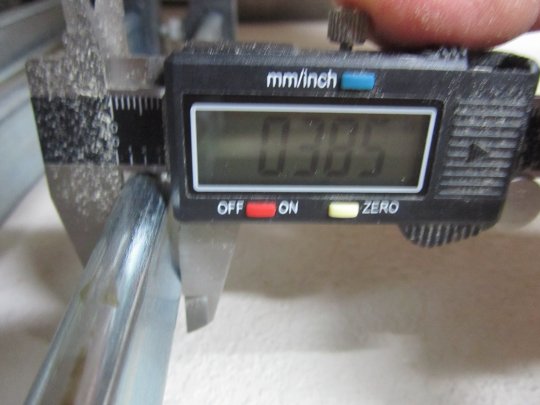
Full Disclosure: 5 1/4″ is not wide enough to fully cover the top or front nose of the clamps (It’s about 1/4″ too narrow). If you feel that you absolutely must shield the remaining part of them from the threat of fairy dust, or something like that, then you will need a thicker board on top and the design changes. This is what I had laying around.
3/8″ slots (.375) are too small. I wanted the nice curved backstop in the rack I was building, and the next size up in my Forstner bit collection would be 7/16″ (.4375) so that’s what I used, which really was a good thing, since it left 1/32″ of “squeeze” room on each side for imperfect cuts. This is also the slot size Marc used, but he’s using Bessey and Jet clamps, so I wanted to be sure. I cut both pieces of 3″ wide plywood, as well as the 5 1/4″ piece, down to 40″ in length. The shortest in length was only slightly longer than this but was out of square. That was the sole factor for determining the measurements. This would allow the rack to be screwed into three studs, with 4″ overhang on each side since my house is notorious for having weird stud spacing (and walls that have 5 degree slopes, while we’re at it). Turns out I didn’t encounter any of that this time around. To layout the slot piece, I marked a parallel line 1″ from the back edge of one of the 3″ wide pieces of plywood. This is actually a pretty crucial measurement. You need 3/4″ of space to accommodate the supporting rail you are attaching under it, plus half of the radius of the Forstner bit you are using, which was 7/32″. The two added together were 31/32″, and I figured that by the time I factored in cumulative error (mostly from pencil line thickness and runout on the drill bit), it would easily take up the spare 1/32″ so that’s how I arrived at 1″. I also chose to space the clamps 2″ apart. This is a less critical measurement, just make sure the spacing is wide enough between them that they can fit into the rack with ease and not bang into each other.
To lay my drill holes out, I found the center of the offset line I just drew and marked it off. I then set my drafting compass to a 2 inch opening and was able to quickly lay out the offsets. (I’ll be doing a “quick tip” entry very soon to show how this is done if you don’t know how to do it.) Anyway, here’s a 2D representation of what the layout and resulting holes dimensions looked like:
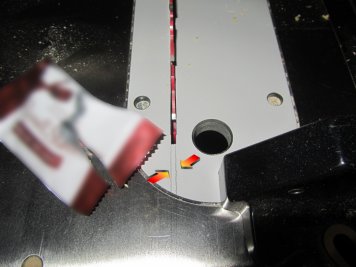
The process is pretty straightforward for cutting things out on the slot assembly, except for the trivial matter of removing the material on the “tangent to edge” lines on both sides of the drill holes. In the comments section of Marc’s article, he suggests using a bandsaw. There’s no way in the world you can pull that off, though. I got about three holes into the job and the rail started banging into the bridge of the bandsaw. I ended up doing all of the cuts on the table saw. I have a long rail that I screw on to the miter guage to support on end cuts like this so I used it with spring clamps to secure it while I made the cuts. To make the cuts as close to accurate as I could, I marked where the kerf hits on the left and right side of the blade with my framing square and a pencil:
Yes, that is a blurred image of a Russell Stovers Pecan Delight candy wrapper, I didn’t want you to be distracted by the sheer awesome that I experienced from consuming caramel, pecans, and milk chocolate in one fell swoop. Ok, it was late, and I was hungry, don’t judge me! 🙂 Anyway, notice the lines I have drawn (highlighted with arrows) away from the blade to indicate the edge of the kerf on the saw blade.
Upend the piece, raise the blade of the saw so that it just kisses the tangent line of the circle, and match up the layout lines to make the cuts. Remember, use the left kerf line for the left side cuts, and the right kerf line for the right side cuts. Otherwise, the cuts absolutely will not line up with the tangents on the drilled circles.
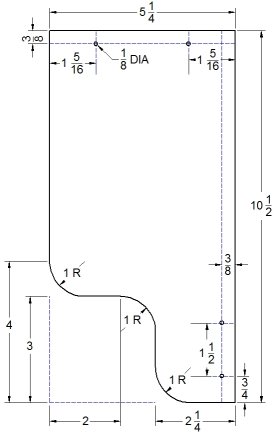
Next, I made the side pieces using some scrap spares from a failed bookcase build (the dado joints wandered somehow). Not too much to do here, just remember that fillets and rounds subtract from the length of your material (apparently I had and ended up bodging one of the side pieces initially). Here’s the drawing, and how it actually turned out:
The whole clamp rack is held together with glue and screws. More importantly, the slot piece that the clamps rest on is affixed to the backer piece using pocket holes, like the ones I used for the simple drill press fence. Nothing special there, but I spaced them away from predetermined locations where I would be screwing the rack into studs on the wall: In the center, and 16 inches to the left and right of center. There were 6 total pocket holes used to attach the two pieces together.
I used 1 1/2″ coarse thread pocket hole screws to assemble the side pieces to the top shelf and lower assembly as well. Since this is an all plywood project, the pocket hole screws will go through the first piece and anchor into the second, pulling the joint tightly together. A little glue in between all of the bonded surfaces, and the rack is extremely sturdy where it counts!
If you would like to have CAD drawings in DWG format of the slotted piece and the side piece, they are available here. Anyone who downloads that and opens it in AutoCAD: Let me know how you fared. I designed them in the much cheaper, much simpler Delta CAD. This is something a CNC machine could turn out in less than 10 minutes I would imagine.
Enjoy!


