Recently, I participated in the Dallas Area Blogshoot, which consists of several, errr bloggers, from the Dallas area, and some from well out of town from what I understand.
James, a best friend of mine (one of the motley crew of brothers from other mothers) and the proprietor of The Redneck Engineer blog, did a fantastic job hosting the event along with Bob S of 3 Boxes of BS. You can read the background “planning” articles of the event here and here, respectively, along with thorough recap coverage of the event on TRE’s blog here. (Just as an aside, if you haven’t checked out their blogs yet, by all means, do so. James some pretty neat stuff going on and Bob always has an insightful read handy.)
During the planning stages of the event, James ran into a dilemma: The range we attend does not have anywhere to hang steel targets, and we REALLY wanted to shoot at steel! Enter Bacon Fat Labs. I agreed to build three target stands for the steel to be placed at the 100, 200 and 300 yard mark of our range. Although there are several projects I have that need to be posted, I’ve been neglecting writing on the new blog for some time and thought this was a good first project to introduce.
Behold, the Bacon Fat Labs portable, no fuss steel target stands:
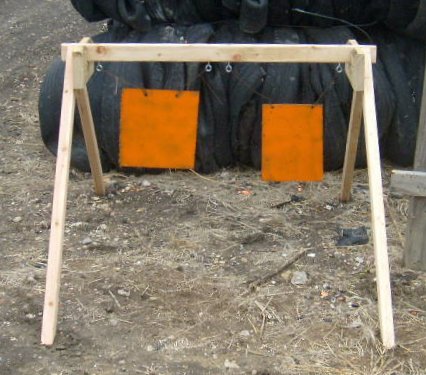
(Image credit: Mrs. Redneck Engineer)
You may have a few outstanding questions, like “Why didn’t you just use normal sawhorses?”, or “Why do you consider them to be no fuss?”, or “Those are super sweet, can I ‘haz’ one?”, or whatever.
First, sawhorses are a no-go because the angles at which they sit are too steep. One hit from even the lightest of rounds to a piece of steel, and you’ll knock it right over. Remember, sawhorses are made to lay things on, which is not what we’re doing at all. Basically, what we need is something that can withstand a high velocity broadside impact.
I consider them to be “no fuss” because the only setup required to make them work is to take the connecting rail with the eye bolts in it to their mating notches on the legs and then splay out the base to finish (I’ll cover the design shortly), and additionally is very portable and lightweight. Best of all, when you hang steel on the connecting rail, the structure stiffens because it pulls the notches tighter, and the angled legs also pull in tighter. The more the weight, the sturdier the base (within reason, I am not responsible for calculating absolute maximum load ratings here, proceed at your own risk). Another reason they are “no fuss” is because they are modular and easy to repair. Someone shoot a leg to shreds with a .50 cal (It happened)? No problem! Another piece of 2×3 whitewood fence rail (or the cheapest you can find) and you’re back up and running. Someone shoots an eye bolt or a hex bolt dead on and sheers it off (It happened)? No problem, just replace with readily available parts from your local big box home improvement store (of course, I’m always in favor of supporting the small business guy if you’ve got one).
If you think they are super sweet and want one, a measured drawing and video will be available at the end of the show for a small fee. No, wait, that’s the New Yankee Workshop. Nevermind. See below for the 3D sketchup drawing and bill of materials, free of charge. One can be made AT MOST for 16 dollars, possibly much less if you use cull lumber or those annoying short cut offs you have laying around like I did.
Operation
Not too much to write home about here. When not being used (ie: transported or stored), the top rail pops off and the legs fold into a straight position. As noted earlier, when being used, the top rail notches fit into the notches for the leg assemblies and the legs fold out to pinch the top rail in place to make the structure solid. I would say it’s essentially foolproof, but with my experience, that’s a claim I am always hesitant to make.
Design Considerations
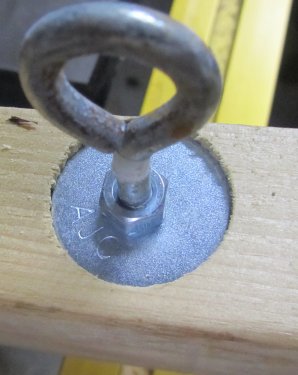
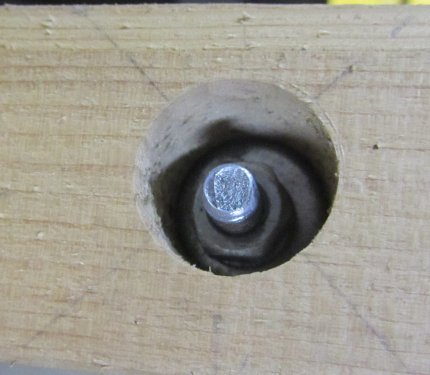
You don’t have to use fence rail lumber, of course. I used it because it was the cheapest piece of lumber at $1.77 for 8 feet at Home Depot (okay, it was more like 7′ 11″ but whatever). I can generally find 4 foot pieces of 2×4 in the cull lumber rack for 51 cents, so go that route if cheaper. The downside is that there likely won’t always be 2×4’s in the cull pile and you’ll spend more repairing them in the long run (cheap 2×4’s are roughly $2.25 here). I chose the 2×6’s for the leg mounts because I had them laying around, and 2×4’s are a little too small for my liking from a structural standpoint (there’s only about 4 inches of support under the notches after cuts are made), but if there’s something larger on the cull lumber rack, it’s certainly easy enough to adapt the design. If you lack a decent drill press or the necessary bits to do the countersink operations, you can do away with them and just use longer hex bolts and eye bolts. The design I have come up with allows these to be totally hidden, which also has the added convenience of not snagging anything or scratching the bed of your truck when “en route”. The one thing that I would stress is important above all, are holes that are as straight and perpendicular where moving parts are considered, otherwise, you’ll probably lose the nice fold up capability which is one of the best parts of the design.
The 3/8″ bolts that were used to assemble the legs were coupled with nylon lock nuts (since there will be movement) and there’s a 1 inch OD flat washer sits on each surface that contacts the wood. The nylon lock nut does an excellent job keeping tension between the two pieces of wood while allowing it to move a little at the same time, but avoid over-tightening them because then the legs won’t move at all.
Note: When assembling the legs, bear in mind the inconsistency in construction grade lumber dimensions. You may wish to drill the legs with a pilot hole and then clamp them in the appropriate place on the 2×6 where it will reside to mark the correct hole location. A certain “fudge factor” not mentioned in the drawing may need to be accounted for here. Also, if you see the attached sketchup design, all of the dimensions specified are the measured dimensions of the lumber I used and not the “marketed” dimensions. For example, the 2×6 is actually a 1 1/2″ by 5 1/2″, and the whitewood rail stock is 1 1/2″ by 2 1/2″ and so on.
To accomplish “field assembly”, special consideration was taken so that no tools would be necessary. If you’re like me, you can count on more than 5 fingers the times you’ve lost tools when they leave the house. Notches are cut between the mating surfaces of the leg assemblies and top cross-member to facilitate this need. Take care to attempt to make these fit as tight as you can, all the while ensuring that minimal force is used to mate them together. Remember, the wood used will likely dry slightly and the joint will loosen slightly over time. The upside is that the weight of the steel targets should still pull the contact surfaces down enough for the stand to be solid.
Here’s a few pictures of things not relatively apparent from the drawings from the cross rail/eye bolt subassembly, there’s a hex nut at the base of the eye bolt that contacts a fender washer on the frame, and a washer/lock washer/hex nut in the countersunk piece to make a stable mounting location for the steel that won’t shake apart:
So how’d they do?
Well, as you can see, they held together, despite every single one of them being shot up pretty bad (note that I disassembled the leg with the sheered bolt head and it didn’t fall apart):
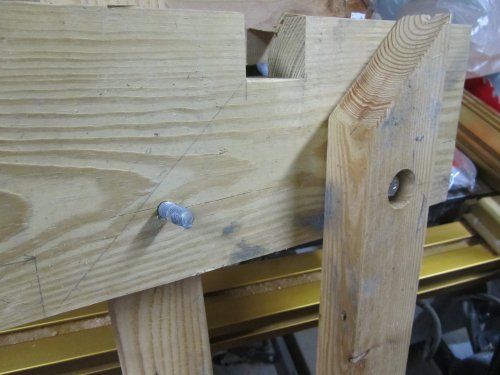
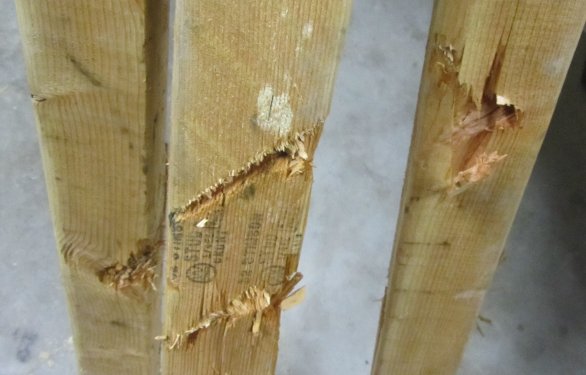
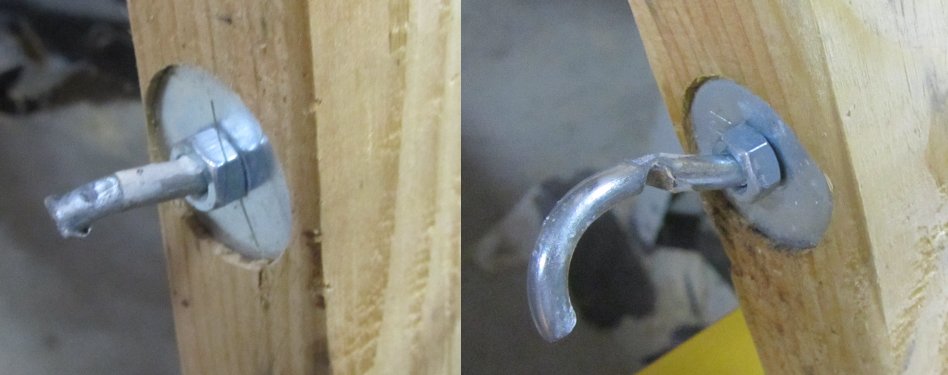
For a very trivial amount of money, I was able to replace a bolt that had been sheered off with a .223 bullet, two eye hooks that someone shot clean off, and all of the lumber that got destroyed on all three stands. For the money, I couldn’t have asked them to perform any better!
If you’d like to build your own, have at it, click the image to download the sketchup file and Bill of Materials in convenient .zip format. Feel free to leave a comment if you like what you see. If you don’t, I also want to encourage you to leave a comment for discussion as long as you aren’t mean 🙂

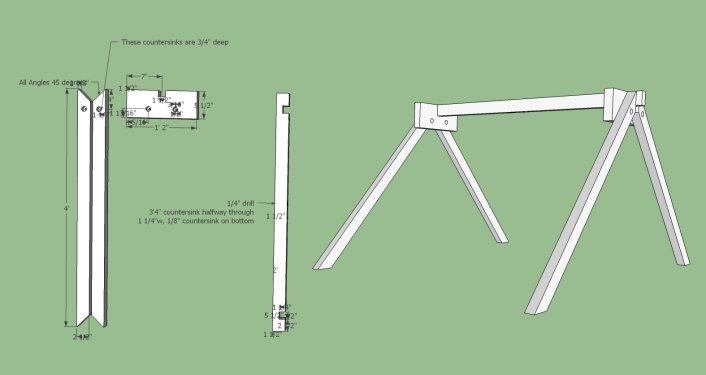
I can’t see the measurements clearly in the drawing – can you send me the drawing in a larger format? Thanks!
Hi there! I don’t have a high resolution drawing, but if you click on the picture it should allow you to download a zip file. There are two files inside of there, a PDF with the bill of materials (.pdf), and a Google Sketchup file (.skp). You can download sketchup for free over at http://www.sketchup.com/ and then just open the .skp file downloaded. Since I did this in sketchup instead of CAD, the drawings aren’t isometric and neither are the measurements. The good thing about sketchup is that you can rotate and pan around the design very easily and zoom in to see how the measurements. If you have any more questions, let me know. I’m more than happy to help.
Oh, that does look like a good idea to hang some steel targets on stand like that. Something like that would be great for my father and I to get for our hunting trip. He has been thinking about getting one before we start hunting deers.