Wow, a tremendous response from some of you who are following my restoration articles! Thank you all for your kind words and support!
For those of you just joining us, we’ve been discussing how to refurbish an old Stanley #4 hand plane that I inherited as a family heirloom. If you have missed part 1, part 2, or part 3, feel free to go back and read them. I’ll wait…..
Some of you may have noticed in part 3 that the plane iron was cutting really rough, despite having trued all of the surfaces of the plane so far. The reason is that not only was the iron not all that sharp (like yours truly at times), but the angle of the cut was not optimal. As if that weren’t bad enough, the angle was not homogeneous all the way across, and there was a small knick in the edge.
We’re gonna wanna take care of that I think……
First, we need to do something called “re-establish the primary bevel angle”. Sounds very techie doesn’t it? I assure you it’s very easy to accomplish. All’s we’re really aiming to do is grind a new surface onto the iron that is perfectly flat, and a consistent angle all the way across. We want a general purpose bevel edge on the iron, around 30 degrees (I’ll cover how we know that in just a bit). For this, I will be using three tools:
- A Honing Guide (I got mine at Amazon for less than $8.00 USD)
- Our float glass with 120 grit paper from previous articles
- A jig for measuring the distance between the edge of the honing guide and the edge of the iron.
- 1000 grit/6000 grit combo Japanese waterstones (Which I also got from Amazon)
The reason we use the honing guide, is because like most of you visiting this article, I CANNOT judge angles by eye for sharpening, and, honestly, people that claim they can are, in my opinion, cheating themselves out of sharpening accuracy. Do what you want with your tools, but mine will be using the guide :-).
Anyway, if you take a look at the side of the honing guide, there is a legend that tells you the space in between the end of the guide tool and the tip of the tool that it takes to achieve a desired angle (feel free to do the necessary trigonometry if you don’t wish to use the legend).
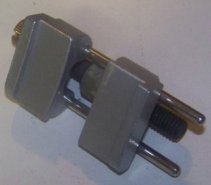
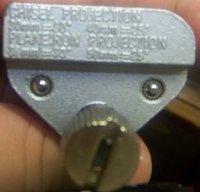
From that, I built a really crude “stop block” measuring tool out of MDF, which can not only be used on my plane iron, but on my chisels as well:
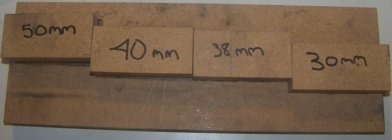
This ensures that not only can I set the jig up quickly every time I sharpen my irons and chisels, but also that I will be able to consistently set it up for the exact distance, each and every time. Now grasshopper, you see how we achieved our 30 degree sharpening angle with the jig! Imagine a gong crash right about now. Let’s set up our iron with the 38mm mark and reestablish our bevel with our sandpaper and float glass:
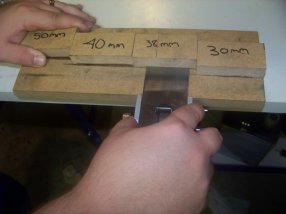
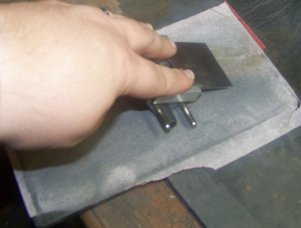
Since the bevel on my iron was so messed up, I had to do this twice. The first time was to make the angle homogeneous, and since a bit more material was removed than anticipated, I re-gauged the distance on my stop block jig and then went across the sandpaper/glass again just to make sure the angle was correct. Once the angle was correct, I finished the bevel off on some 400 grit and 600 grit wet sandpaper to polish the blade a little before I moved to my 1000 grit/6000 grit water stones.
At this point, we have a nice, consistent bevel worth putting a cutting edge on. To do this, we turn to the water stones! Personally, I would like to take these down to 8000 grit, but there’s only one company who makes a combo wetstone, Norton, and I haven’t been able to quite stomach the 75-something-dollar price tag, especially since the water stones I have are still in good shape. Maybe in the future, but if it’s in your budget, go for it. Let me move on before I go too far off into that tangent. A good practice that I like to adhere to is to keep the stones soaked in water, so they are ready when I need them. Otherwise, you’re looking at soaking them for at least 8 minutes before use. I use one of those disposable tupperware containers, and it seems to work well, but a lot of water stones will often times come with their own “wet storage” containers.
Now, we’ll set up shop on “ye olde workbench” with the water stone and my spray bottle of clean water handy, and at the risk of sounding as long and drawn out as a Joseph Moxon text, I’m going to try to explain how to get a razor sharp edge on to the plane iron. First, we need to put a slight back bevel on the back of the iron, spacing it at around 1 or 2 degrees using a thin strip of metal (I harvested this one from an old sheetrock mud bucket I threw away, but a lot of people use thin metal rulers for this). Why do we have to bevel the back of the blade when we’re cutting with the primary beveled side? The easy answer is that it (theoretically) improves your cut by slightly decreasing the cutting angle.
Right about now, you may be saying “Eric. Stop. You’re losing me here”. All’s I am saying is that we’re back beveling the edge in order to have a slightly steeper angle and reducing the amount of blade contacting the surface of the wood, thus making for a smoother cut by reducing cutting friction. Now I can hear you saying, “Well, why don’t we just grind the primary bevel at a steeper angle if we’re just reducing surface area?” The answer is, it inherently makes the blade weaker by doing that. The metal of the iron has less structural support and becomes flimsy. Okay… “Well, what’s different about the back bevel then?” We’re accomplishing the goal of an “effective angle” by using a small compounded angle on the backside, leveraging the tensile strength of four compound surfaces instead of three. In essence, it helps split the forces from the cut a little better by sharing the load in different directions. As a layman’s comparison, think of a bridge with circular pillars where it meets the water of a river. They aren’t square because it would take a stronger material to absorb the force of the rushing water. By changing the shape, and adding more directions for the water to contact, we accomplish the goal of dissipating more force with the same amount of material. The magic of applied physics is a fantastic thing. I’ll move on now, I can see you’re growing tired of this discussion.
Anyway, using the 1000 grit side of the wetstone, with plenty of water on it, I place the back of the iron on it using the metal strip as the spacer. Rock it in a back and forth motion, while moving side to side, for about twenty or thirty strokes…oh bother, here’s a video:
If you see the top of the stone start drying out, add a small amount of water to it from your spray bottle. What you do not want to do, is remove the dirty looking water. We refer to this as “slurry”, and that’s a good thing as it aids in the sharpening process. In fact, you absolutely want a slurry on the surface of your stone at all times. After you are done, you will notice a small mirror edge on the back of the blade. I have been in several discussions on whether to go ahead and sharpen the back edge of the iron with the finer grit side. Some people think it is not necessary, others think it is absolutely necessary to mirror the finish of the bevel with the back bevel with the same grit. I’m not sure who is right, so even if it’s not necessary, at the risk of overkill, I repeat the back bevel sharpening process with the 6000 grit side. I know it adds time, but, in reality, it’s just a little bit of patience, which is what most woodworkers possess anyway. When we finish with the back bevel, it should look something like this:
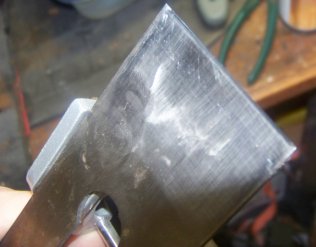
(Note: I know this isn’t the best picture. It was hard to get a contrasting picture of the back bevel with the trashy fluorescent lighting in the shop, so I apologize)
Now, we just flip the blade over, and return to the 1000 grit side. With the honing guide set, and using methodical strokes from the far end of the stone to the near side, run the bevel across the length. Do this slowly, taking your time to ensure the blade stays flush and fully contacting the stone. Eat your heart out, Moxon.
Anyway, I achieved a suitable edge from 30 strokes. Repeat this process with the 6000 grit side, and you should have a nice mirror finish edge that looks similar to this:
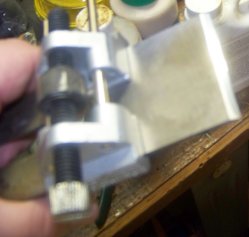
(I know this isn’t a great picture either, but since I couldn’t get a good contrasting shot, look at how the light shimmers off of the edge in comparison)
Now, the good stuff. We want our iron to not just cut, we want it to cut with ease. This can be accomplished by using a bit of pressure on the edges while you drag the plane iron on the water stone. I generally match the number of strokes I use to put the edge on with this process. Use the same dragging motion as above, with the slight difference of adding pressure to the edges. Here’s a picture of where my fingers are during the sharpening process:
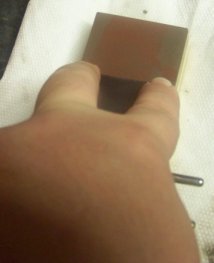
This will give you a slight curvature to the plane iron that greatly increases cut quality. I’m talking the kind of ease in a planer that would make your mother so proud she would cry.
And with that, our planer has been fully refurbished. For those of you who do not know how to adjust your planer for operation, I will be coming out with a supplemental on that very shortly. Otherwise, I wish you the best of luck with your woodworking endeavors, even if they do not include rehabilitating an old, worn out heirloom.
Oh, in case you were wondering how it cuts, well, see for yourself!
Related Posts:
Refurbishing Old Hand Planes Part 1: Flattening the Sole
Refurbishing Old Hand Planes Part 2: Truing the Frog
Refurbishing Old Hand Planes Part 3: Modifying the throat and chip breaker

Hi,
A very nice presentation and just in time to use with the $3.50 realllllllllly rusty Stanley #4 (type 11) from an Amish flea market here in PA. Thank!
Great find! Best of luck in your restoration efforts. If you run into any issues, let us know and we’ll do our best to help out between napping from those gas station hot dogs we love. 🙂
So, my plane I’m restoring won’t hold the settings, besides the screw that tightens the lever cap not being tight enough, what could cause the iron to not stay put when I go to plane.